Institute of Imagination Core activity
Core activity

Wind Tunnel

Make something light enough to fly, and put it into the airflow.

5
Makes
28
Materials named
3
Printed step strips
3
Trays cut in advance
What it is

The activity

Children make a lightweight flyer and test it in the tunnel. The example board is headed Can you make it fly? and pins up five makes with the built object beside each label.

Nothing is finished until it has been in the airflow.

Theme

  • Flight. Light enough, and shaped to catch air.
  • Biomimicry. Nature solved these shapes first, and two of them are on the table as cutouts.
Explore

Aerodynamic animals

Two printed cutouts on the example board: a kingfisher and a bullet train.

The bird's beak enters water without a splash, and the train's nose was shaped to enter air the same way, to stop the bang heard at a tunnel mouth.

Printed A4, colour, one side.

The sycamore seed

The paper helicopter is a samara. It spins as it falls, and the spin slows the fall.

It is the one make here with a nature example a child can hold in the other hand.

Can you make it fly?

What in nature already flies like that?

  • a seed that spins
  • a bird that dives
  • a jellyfish that drifts
  • a parachute of thistledown
Make

Examples

Check the example board before the doors open, and rebuild it only if it is damaged. Click the photograph to enlarge it.
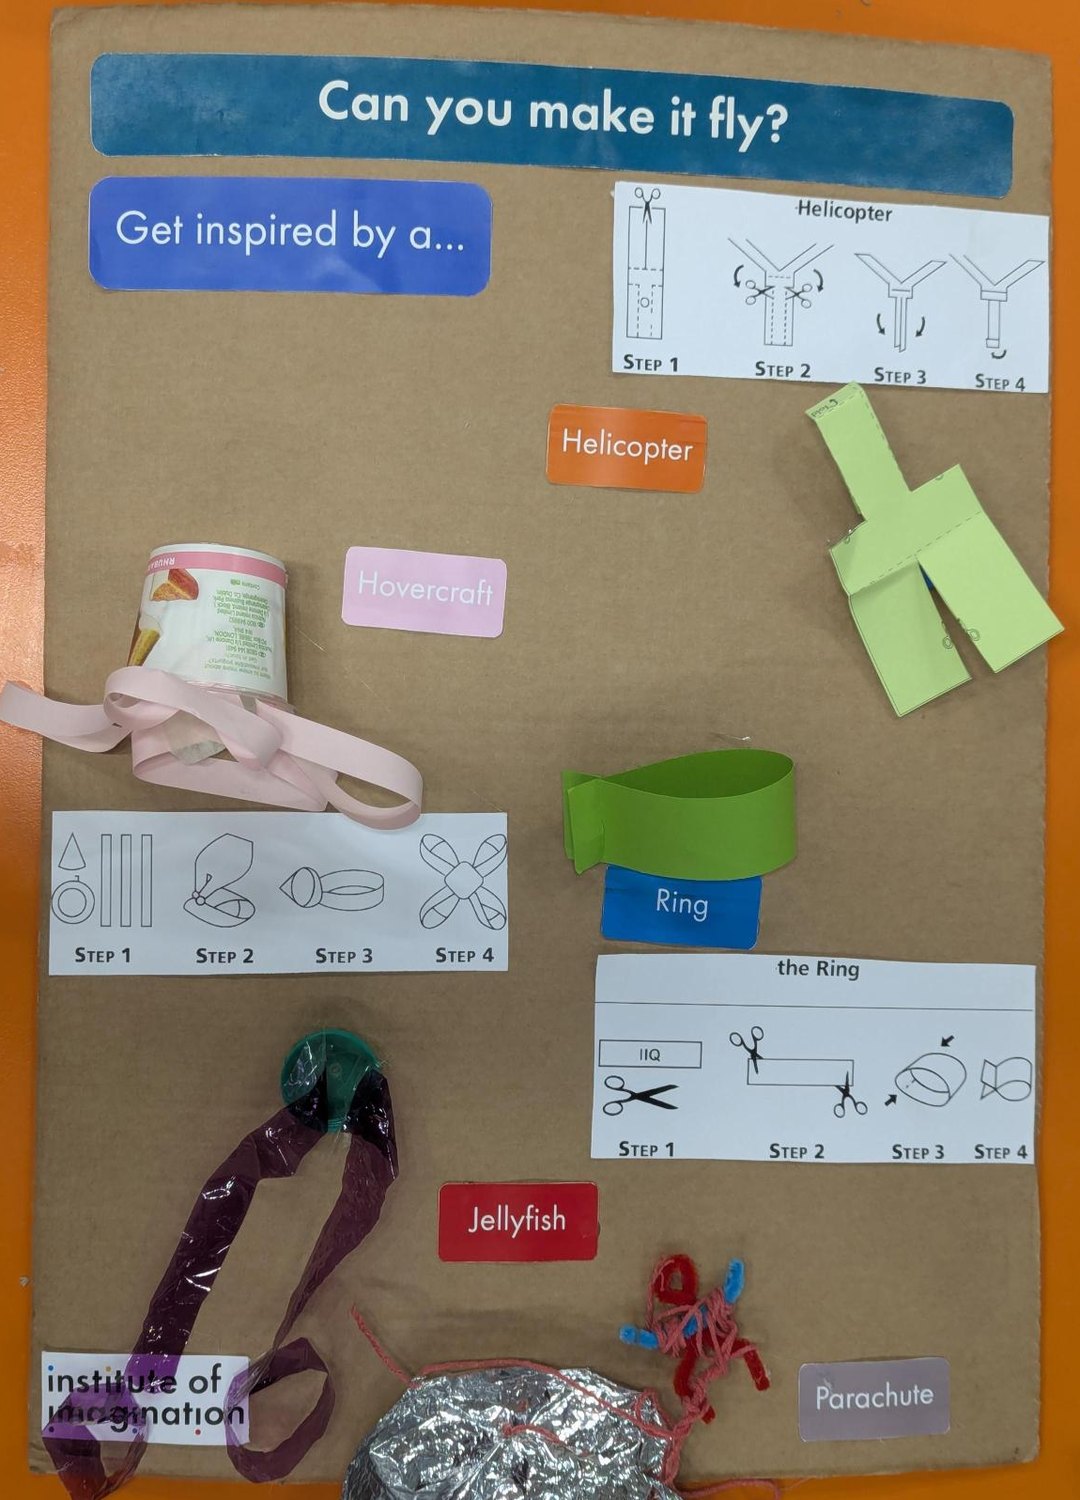
The Can you make it fly? board: the five makes labelled Helicopter, Hovercraft, Ring, Jellyfish and Parachute, each with the built object pinned beside its label, and three printed four-panel step strips.
Can you make it fly? The five makes, with the built object beside each label.

Paper helicopter template

Handed out at the table, one per child who makes a helicopter

A4, mono, 1 side · the PDF

Sign

Above the station

A3, colour, 1 side

Techniques

Five makes. A child picks one, and each is its own short build.

Helicopter

One printed template.
Cut down the middle from the top, and a notch in at each side.
Fold the two side flaps in over the body.
Bend one blade forward and the other back, then drop it.

Hovercraft

An empty pot and four strips of paper.
Bend each strip into a loop and tape the ends together.
Cross the loops and tape them together at the middle.
Sit the pot on the loops, open end down.

Ring

One strip of thick coloured paper.
Cut a slot in from the top at one end and from the bottom at the other.
Bring the two ends round and slot them together.
Push the two slots into each other, so the spare ends stand out past the join.

Jellyfish

A bottle cap and four strips of cellophane.
Bend two of the strips into loops and tape the ends together.
Tape a loop to the end of each of the other two strips.
Tape both strips under the bottle cap.

Parachute

A square of emergency blanket, four lengths of yarn and a pipe cleaner.
Tape a length of yarn to each corner of the sheet.
Bend the pipe cleaner into a little figure and tie the four ends to it.
Hold it in the airflow. The sheet opens.

Balloons and straws are there for younger children.

Steps

  1. Look at the board. Five makes, with the built object beside each label.
  2. Pick one and make it, from the trays of cut strips.
  3. Put it in the airflow. That is the test.
  4. Change it and test it again, for as long as they want to.
A flyer is in the tunnel inside ten minutes on any of the five. Step 4 is where an hour goes.
Setup

Materials

To fly

  • coloured cellophane
  • coloured paper, thick
  • coloured paper, thin
  • tissue paper
  • emergency blankets
  • feathers
  • paper cups
  • light junk

To join

  • masking tape
  • clear sellotape
  • glue sticks
  • yarn
  • pipe cleaners
  • scissors

The tunnel

  • display board
  • display board holder
  • fan repair kit

Adult use

  • glue gun
  • glue gun sticks
  • superglue

For younger children

  • balloons
  • straws

Print

  • paper helicopter template
  • example cutouts
  • sign

Made in advance

  • wind tunnel
  • board example
  • cut strips

The jellyfish needs a bottle cap, which a child fetches from the shared materials station.

Setup

Specialist kit

The tunnel, with the mesh attached before the day. The fan repair kit travels with it: dowels, cable ties, a small hook and pliers.

The fan needs a socket. Where the tunnel stands is decided by where the socket is, not the other way round.

Cut in advance

Three trays of strips before the doors open: cellophane, thick paper, thin paper. Refilled from stock through the day.

Printed

The helicopter template, A4 mono, one per child. The sign, A3 colour.

Reset between children

Offcuts cleared, scissors back in the pot, the trays topped up.

A flyer left in the airflow blocks it for the next child.

Safety
Children handleScissors, children's scissors. Pipe cleaners, balloons, straws and paper cups are per child.
Adults handleGlue guns, adult use only. Superglue, staff use only.
The fanA factory chrome finger guard is fitted to the fan, and that is what protects fingers. A net sits on top of the guard, below the fan, mostly to stop cellophane and other light material being drawn into the blades. The top is not covered. Supervised at all times. It is mains and needs a socket, so the station has a trailing lead.
The airflowNothing is fired into the wind tunnel. Flyers are held in the airflow or let go into it by hand.
First aidCuts, from the children's scissors. The first aid pack is at the tool area.
The fan repair kit is not a first aid kit. It holds dowels, cable ties, a small hook and pliers, and it is for the tunnel.
Notes